Thursday, September 20

Bathroom Organization Update

You guys thought I forgot about Organizational Wednesdays this week, didn't you?

No way, Jose.  Today is Wednesday.  You heard me.

So, I actually got a lot done this week!

Here's the final shelf in my small bathroom shelf, {you can see the before of this project here.}


I decided to use this shelf for all of our "extras."  {Brian is apparently stockpiling deodorant.}

And, again, loving my wire shelves.

I also tackled my bathroom drawer.


The key here is containers.  The key to organization is containing.  


I moved the cleaning supplies out from under the sink, {more on that later,} but I left a few things that I use more frequently.  


And moved all of my hair styling tools under the sink as well into this basket.  A good goal is to keep your counter tops clear!  I still haven't figured out where to keep all of my hair products...but things are coming along nicely!

SO that's it for Organizational Wednesdays this week.  

Until then, enjoy the rest of your Wednesday, everybody.

You heard me.


DIY Lamp Makeover {with Wiring Instructions}

Hello there!

So tonight I have another, "I told you one day you'd thank me for being a hoarder," makeover.

My grandmother, Marjorie, gave me this lamp years ago.  I've seriously been hanging on to this one for several years.  It was tucked away in my hall closet at the garage apartment...the entire time that I lived there.


Wouldn't you have hung on to it?  I think that it is so fun.

I knew that it had potential, and because I needed a lamp for Brian's bedside table, {and because it may or may not have been tucked away in the pantry pre-organization...} I tackled this old lamp.


So, I took it all apart.  

You'll discover pretty quickly that a lamp is basically all held together by the wires.

Unless you detach the wires from the socket, it's going to be pretty hard to get everything apart for painting.

But you can see here that the bottom part of the socket can be easily removed.  If you see the letters printed by my thumb, you can press there and the bottom should pop right off.


Then, the ends of the wires will be exposed.  So just loosen the screws and unwind the wires.


Then you should be able to pull all the wires out and separate all of the pieces.

So, I wasn't crazy about the green glass piece.  I considered removing it and attempting to craft something out of a wine glass or maybe a mason jar, {which would have been awesome, right?}

But then I noticed this:


At first I thought that they were cracks in the glass, but then I realized that the glass itself wasn't green, but had a thin, colored film adhered to it.

So, after a call to my dad, I decided against trying to scrape the film off with a sharp object...

And tried using nail polish remover instead.  This worked, but very very slowly.  So I took my problem to the internet, and found this article on Apartment Therapy.  

Unfortunately, my dishwasher was in the middle of a cycle already, so I impatiently filled up my sink with hot, soapy water.


Worked like a charm!

As soon as it hit the water, the film started bubbling up away from the glass and I was able to just peel it right off!  I did have to scrub it in a few places, but it was really easy.  I was so excited!

Who needs mason jars?

I'm totally kidding.  I love mason jars.  But this is pretty great!


Here you can see that it peeled right off in long strips.  

So, I spray painted the metal pieces with a red spray paint color I chose for our bedroom to match an accent in our bedding.  Then I just put it all back together...wrapped the wires around the screws and tightened them back up.

I was pleasantly surprised when the lamp actually turned on.


Love it!

I forgot to tell you one of the best parts about the lamp:


There is a socket in the glass section for a light bulb, {Christmas tree size.}

Let's say it together:  LOVE.  IT.


And this is the lamp on my side of the bed.  It was just an old white lamp which, I think, was in my bedroom when I was little...it was also tucked away in the hall closet for a few years.

The shades are from the Target Home Mix-and-Match Lamp collection.


Here you can see the red accents in our bedding from West Elm...


And here...


{I love our West Elm bedding...}

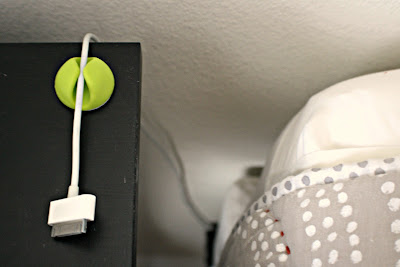
I saw these CableDrop Cable Clips on Pinterest and we ordered them from Amazon.  I hate having to fish around behind my behind my bedside table to find my iPhone charger at night, so I actually really love these.  Plus, they come in fun colors.


{I also put one on the back of our TV Unit in the living room to hold the HDMI cable that we frequently switch between our cable box and our laptops.  So now we can find the right cable easily without having to fish around back there.  Which is frustrating.  I don't like fishing.}

So while we're in the bedroom I'll go ahead and give you the rest of the tour.

It won't take long.  I haven't done much decorating in here yet.  But you might remember this from the tour of my old garage apartment:


I updated it a little by adding a second layer of scrap book paper behind each letter.

E voila:


I love this.  Even more than I did in the old house.  I tried it as a "headboard" but it just didn't work, {the source for this idea used the garland as a headboard,} mine is too small.  But I love it here!


So that is the view from the bedroom into the bathroom.  

That is literally all of the decorating I have done.  But I really am loving the color scheme happening in there.  It's all very subtle with the deep browns in the furniture and the neutral bedding, but they each have great, colorful accents in them, too.  So there's a lot of potential for more color.

I'm really looking forward to figuring out our headboard situation!  And I'd also like to find a fun accent pillow for the bed.

So that's all I've got for you tonight.  

Actually, that's a lie.  But you'll have to wait and see.

Until then...


Wednesday, September 12

First Organizational Wednesday

So I promised you a new, organized bathroom cabinet for our first Organizational Wednesdays post this week.

That's not exactly what you're going to get.

I realized that this small bathroom cabinet makeover would actually include a complete organizational overhaul in our bathroom.  Because I couldn't figure out what I needed to make space for in the small cabinet without taking everything out of every cabinet and closet in our bathroom...

This job is in progress...but not complete.

BUT, that is not to say that I did not make a whole helluva lot of progress in our home this week. 

Because, while I didn't have time to finish the bathroom, I did take on another pretty big project.


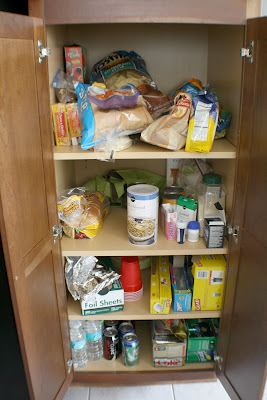
The kitchen pantry.

Oye.  It was a mess.  

Now, we were pretty excited about this nice big pantry when we found our condo, but I just didn't get a jump on the organization when we moved in, so things were just tossed in over the last couple of months...and this is what happened.


It was pretty hard to know where anything was in there.  Not efficient.  

So, here is what my Clutter Rehab book recommended.  


Take everything out.  Everything.  

This was the last thing that I wanted to do.  But, honestly, it's the best thing you could do.  

Because, otherwise, I wouldn't have known what was in there.  

And if you don't know what's in there, you can't create categories.

Once you create categories, it really happens all on it's own.  And coming from me, that's saying a lot.

But it really was easy.


Another tip from the book is to create boundaries for your categories, so you know what you have and how much of it there is left.  

With things like crackers or other individually wrapped snacks, take them out of their bulky boxes and consolidate.  As you can see, that made a lot of a difference in space there.

Can you tell I live with a student?

This did, too.  I bought a package of 6 wire shelves from Wal-Mart for $12.  

I especially love the under the shelf shelves.  Yes, that entire shelf is devoted to ramen noodles.


So, I seriously love this shelf.  It's amazing how much I was able to fit in there without it seeming so crowded like it did before.  Ah, wire shelving.  Doubles your space.

And another tip is to think about where you need things to be to make your life as simple as possible.

I have been keeping Atticus' many many medications in the pantry because I give them to her in the morning before I feed her.  I started to move them into the medicine cabinet but that would honestly be kind of a pain in the mornings, and let's be honest, I'd probably forget to give them to her if they weren't right there in front of me.  Mornings around here are rough.

So, instead, I decided to consolidate.  I took all of the little packets out of the boxes and cut them up into their doses.


Much better.

So, here we go.


Love, love, love my new pantry!  I went for the ugly flash for this pic because I wanted you to be able to see all the way to the back.  

The best part is that I know where everything is.  AND I was able to use that bottom shelf for my Crock-Pots, which was a nice bonus because that freed up a lot of space in another one of my cabinets.  

Hurrah.

Here's up top.

See Atticus' meds?  Cute.
So all of that up top is my baking things, believe it or not.  There's a lot.  

I really love my new pantry, and it has definitely helped me catch the organizational bug!

Because, honestly, before when I would open my pantry...I was overwhelmed.  Every single time.

And now I feel really great when I open my pantry.  What a simple way to sneak joy into your day.

That's right, I said joy.

Now, I don't want you to think that I'm lying about my little bathroom cabinet, so I want to show you the progress that I've made.

On the bottom shelf I created a little First-Aid spot for all our medicine, etc.

I thought the red bow was a cute touch.

Next, believe it or not...this is all of my nail stuff.


Yes, really.


That's my Nailene Sensationail Invincible Gel Polish kit.  Yes, I saw it on a TV commercial, but I seriously love it.  It works.  It's easy.  You should get it.  

I actually did my nails with it last night.  


Pretty good, huh?  It really is invincible.  Lasts quite a while.  

So, that's it for my first Organizational Wednesdays post.  I must say I am pretty impressed with myself.  

Working on the rest of the bathroom and all of the other kitchen cabinets this week.  

Until then, have a great Thursday, folks.


Sunday, September 9

Happy Birthday, Atticus!

Atticus is 4 years old now.

We're not really sure when her birthday is, but the vet guessed when she was found that she was 3 months old.  That was in November of 2008.

I feel like this needs some sort of disclaimer...I don't throw my dog a birthday party every year.

But I feel like that would just surprise you.

Doesn't it surprise you that this is the first time that I've done this?

It surprises me.

But Atticus has had a rough couple of months.  And she's finally feeling better and seems more like herself...so, I felt like celebrating.

Plus, while Brian & I were in the emergency animal hospital at 3 in the morning with her, we read on a chart that Atticus is about 27 in dog years.  I'm about 27 in human years.

Back in November of 2008, I had just spent a weekend away with my cousin, Grove, and her husband, Adam, at their home over on the Gulf Coast.  I was actively looking for a puppy to adopt, having just settled into my first apartment on my own.

Grove and I looked around while I was there, checked with a few animal shelters...but didn't find anything.

The night that I got back home, I received a text from Grove.  It was a picture of Atticus.

"I think I found your dog," she said.

A friend of Grove's had found her on a rural road.  I told her that I wanted her, and the next morning my mom and I drove halfway to Grove's to meet them.  To meet Atticus.

This was the first time that I saw her.


Obviously, it was love at first sight.


I was on my own for the first time in my life.  But then I had Atticus with me.

She's been with me ever since.

Christmas 2008


So, you get it.  I love my dog.  

And now she's Brian's dog, too. 

And now she's 4 years old.  Or 27.  

And I felt like celebrating.


So, because Atticus has been having her health issues, I have been very interested in finding some healthy homemade treat recipes.  

By the way, we no longer think she could have epilepsy because she has improved so much since we started giving her a daily antihistamine.  In fact, she hasn't gotten sick in a few weeks now, {knock on wood} so we definitely think that the issue is allergy related.

I found the recipe for these treats on Dog Nutrition Naturally.

Sandra, the site's author, has done excellent research on the topic and her site is full of great information.  

Basically, the idea behind these treats is that dogs are carnivores.  And I am no expert, but she explains that dogs do not need carbohydrates in the same way that we do...and carbohydrates make up the bulk of most popular dog food brands out there today.  

So, Atticus' food now is grain-free, but it is chicken based.  In doing my own research on the episodes that Atticus was having, I read that it is fairly common for dogs to be allergic to poultry.  So, I wanted to find a recipe without chicken, too.

Here is the recipe that I found on Sandra's site:

1 large sweet potato, diced and then boiled for about 10 minutes.

And then mashed...I ended up taking the skin out.
1 large egg
1 lb of your choice of ground meat, {not vegan}
I used ground beef, $4.
Also mix in 5 Tbsp of rolled oats and a 1/4 teaspoon
of garlic powder.
Spread it out onto a lightly greased baking sheet
& bake for 1 hour at 350 degrees.
"that smells good.  is that for me?"
Not sure why this happened...
but at this point you should take the pan
out of the oven and cut the mixture or
use your cookie cutter.
Like this.  And then put it back into the oven at 250 degrees
for another hour.

So, this is how they turned out.

Not how I thought they'd look, but Atticus was very pleased.  

I'm keeping them in an air tight container in the refrigerator.

The recipe for the cupcakes came from DogTreatKitchen.com

This recipe calls for whole wheat flour...3 cups, in fact, which seemed like a lot to me.  And I actually ended up reducing the amount because the mixture was so dry.

But I used brown rice flour, to keep the cupcakes gluten free.

2 cups of shredded carrots
mix together with 3 large eggs {oye, that's a lot}
and 1/2 cup of unsweetened applesauce.

In a separate bowl, mix together 3 cups of gluten free flour,
2 tsp of cinnamon, and 1/2 cup of rolled oats.

Then, slowly, mix the wet and dry ingredients.
Like I said, this was super dry, I did not add all of the flour
and I added some extra applesauce.

It's helpful to wet your fingers and press the dough
into the cupcake liners.

The cupcakes won't rise, so fill them on up.

I made the frosting using reduced fat
cream cheese and applesauce.

I forgot to buy a candle...but this ended up being a lot better, I think.

Plus, putting a yummy cupcake in front of a dog with a lit candle stuck in it probably isn't an awesome idea.


Sweet Atticus, these pictures crack me up.  I am definitely going to frame some.  

I think they would be really cute as a series, maybe with some colorful mattes.  Maybe hanging in the kitchen?

I don't know, but I love them.  And I love her.  

She seems a little sluggish tonight...I'll probably let her have more of the cupcakes, but probably not a whole one at once.  They are very dense, but she loved them!

So, Atticus and I are the same age now.  And all I can think about is how from now on she will be growing older much faster than I am.

It doesn't matter, Atticus is going to live forever.  Until then, I hope you love your life as much as I do.